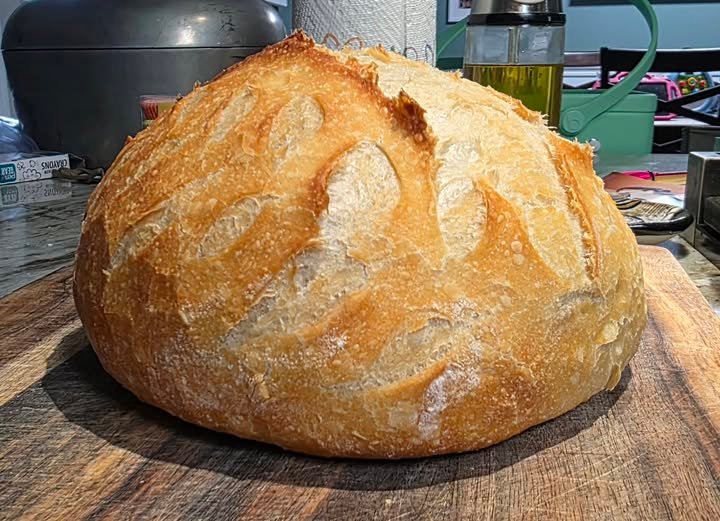
There’s nothing quite like a freshly baked loaf of homemade sourdough bread. With its crisp, golden crust, chewy texture, and deliciously tangy flavor, sourdough is one of those breads that tastes even better when you make it yourself.
The process takes time, but most of that time is hands-off. Once you understand how the sourdough starter, fermentation, folding, shaping, and baking work together, making beautiful sourdough bread becomes much easier.
What Is Sourdough?
Sourdough bread is made without commercial yeast. Instead, it relies on a sourdough starter, which contains naturally occurring wild yeast and beneficial bacteria.
The starter ferments the flour and water, producing carbon dioxide that helps the bread rise while also creating the characteristic slightly tangy flavor of sourdough.
Ingredients
For the Dough
- 500 g bread flour
- 350 g water
- 100 g active sourdough starter
- 10 g fine sea salt
This recipe produces approximately one medium-to-large loaf.
Optional
You can replace a portion of the bread flour with:
- Whole wheat flour
- Rye flour
- Spelt flour
For a beginner loaf, however, keeping most or all of the flour as bread flour makes the dough easier to handle.
Equipment You’ll Need
- Large mixing bowl
- Kitchen scale
- Dough scraper
- Clean kitchen towel or bread cover
- Dutch oven with lid
- Parchment paper
- Razor blade or bread lame
- Cooling rack
- Instant-read thermometer, optional
A kitchen scale is highly recommended because sourdough recipes are much more consistent when ingredients are measured by weight.
Step 1: Make Sure Your Starter Is Active
Before beginning the dough, your sourdough starter should be healthy and active.
A mature starter should:
- Rise noticeably after feeding
- Have bubbles throughout
- Smell pleasantly sour, yeasty, or slightly fruity
- Become active within several hours of feeding
- Ideally double in volume after feeding
If your starter is sluggish, feed it and wait until it becomes active before starting your bread.
A starter that has recently peaked and is beginning to flatten can still work very well.
Step 2: Mix the Flour and Water
Add:
- 500 g bread flour
- 350 g water
to a large bowl.
Mix until all the flour is hydrated and no large dry patches remain.
The mixture will look rough and shaggy. That’s completely normal.
Cover the bowl and let it rest for approximately 30–60 minutes.
This resting period is commonly called an autolyse. It allows the flour to absorb water and helps gluten development begin naturally.
Step 3: Add the Sourdough Starter
Add:
- 100 g active sourdough starter
to the dough.
Use wet hands to gently squeeze, fold, and mix the starter into the dough until it is evenly distributed.
Don’t worry if the dough feels sticky at this stage.
Cover and let it rest for about 20–30 minutes.
Step 4: Add the Salt
Sprinkle:
- 10 g salt
over the dough.
Add a small splash of water if necessary and gently work the salt into the dough using your fingertips.
Pinch and fold the dough until the salt is completely incorporated.
The dough should gradually become smoother and more elastic.
Step 5: Begin Stretch and Folds
Instead of aggressively kneading the dough, sourdough is often developed through a series of stretch-and-folds.
With slightly wet hands:
- Grab one side of the dough.
- Stretch it upward gently.
- Fold it over the center.
- Turn the bowl.
- Repeat on the remaining sides.
This is one complete round.
Perform approximately 3–4 rounds, spaced about 30 minutes apart.
For example:
- 12:00 — First fold
- 12:30 — Second fold
- 1:00 — Third fold
- 1:30 — Fourth fold
As fermentation continues, the dough should become smoother, stronger, and more elastic.
Step 6: Bulk Fermentation
After the final fold, leave the dough covered at room temperature for bulk fermentation.
This is one of the most important stages of sourdough baking.
The exact time depends heavily on:
- Room temperature
- Starter strength
- Flour
- Water temperature
- Dough temperature
Rather than relying only on the clock, watch the dough.
Signs Bulk Fermentation Is Progressing
The dough should:
- Become noticeably puffier
- Develop bubbles
- Feel lighter
- Have a smoother surface
- Increase in volume
- Jiggle slightly when the bowl is moved
You don’t necessarily want the dough to double in size.
For many sourdough loaves, an increase of roughly 30–75% can be enough depending on dough temperature and fermentation conditions.
Step 7: Pre-Shape the Dough
Lightly flour your work surface.
Turn the dough out carefully.
Using a dough scraper, gently shape it into a loose round.
Avoid pressing all the air out of the dough.
Let the dough rest uncovered for approximately 15–30 minutes.
This is called the bench rest.
Step 8: Final Shaping
After the bench rest, shape the dough more tightly.
One simple method is:
- Gently flatten the dough slightly.
- Fold the bottom portion toward the center.
- Fold the sides inward.
- Fold the top down.
- Roll or pull the dough gently toward yourself.
- Create surface tension without tearing the dough.
The finished dough should have a smooth, relatively tight outer surface.
Step 9: Place Into a Proofing Basket
Generously flour a banneton or bowl lined with a clean kitchen towel.
Rice flour is particularly useful because it is less likely to stick to wet sourdough dough.
Place the shaped dough into the basket with the seam facing upward.
Cover it.
Step 10: Cold Proof
For better flavor and easier handling, place the covered dough in the refrigerator.
Allow it to proof for approximately 8–16 hours.
Cold fermentation slows the yeast activity while allowing flavor to continue developing.
An overnight proof is especially convenient because you can bake the bread the next morning.
Step 11: Preheat the Oven
Place your Dutch oven inside the oven.
Preheat to approximately:
240°C / 465°F
Allow the Dutch oven to heat thoroughly for at least 30–45 minutes.
A properly heated Dutch oven helps create the steam needed for a beautiful crust.
Step 12: Score the Dough
Remove the dough from the refrigerator.
Place it onto parchment paper.
Using a bread lame or very sharp razor blade, make one deep slash across the surface.
A simple long score is perfect for beginners.
The score gives the expanding dough a controlled place to open during baking.
Step 13: Bake the Sourdough
Carefully place the dough into the hot Dutch oven.
Cover with the lid.
First Stage
Bake covered at:
240°C / 465°F for approximately 20 minutes.
The covered environment traps steam and helps the loaf expand.
Second Stage
Remove the lid.
Reduce the oven temperature to approximately:
220°C / 425°F
Continue baking for another 20–30 minutes, or until the crust is deeply golden brown.
For a crispier crust, you can leave the loaf in the turned-off oven for a few additional minutes with the door slightly open.
Step 14: Let the Bread Cool
This step is extremely important.
Remove the loaf from the Dutch oven and place it on a cooling rack.
Allow it to cool for at least 1–2 hours before slicing.
Although the bread may smell irresistible, cutting it too early can result in a gummy interior because the crumb is still setting.
How to Tell When Sourdough Is Fully Baked
A properly baked loaf should have:
- Deep golden-brown crust
- Firm exterior
- Hollow sound when tapped
- Light, chewy crumb
- No wet or gummy center
If using a thermometer, the center of the loaf is generally around 95–99°C / 203–210°F when fully baked.
Why Did My Sourdough Not Rise?
There are several possible reasons.
1. Weak Starter
If your starter isn’t sufficiently active, it may not produce enough gas to raise the dough.
Feed your starter regularly and use it when it is visibly active and bubbly.
2. Under-Fermentation
If the dough hasn’t fermented enough, it may be dense and difficult to shape.
Give it more time, especially if your kitchen is cool.
3. Over-Fermentation
If the dough ferments for too long, the gluten structure can weaken.
The dough may become extremely sticky, loose, and difficult to shape.
4. Cold Environment
Sourdough fermentation slows considerably in cooler temperatures.
If your kitchen is cold, fermentation may take significantly longer.
5. Too Much Water
High-hydration dough can be challenging for beginners.
If your dough feels impossible to handle, try reducing the water slightly in your next loaf.
Why Is My Sourdough Dense?
Dense sourdough can result from:
- Weak starter
- Under-fermentation
- Incorrect dough temperature
- Not enough gluten development
- Poor shaping
- Cutting the bread while still hot
Focus particularly on starter activity and bulk fermentation.
Why Is My Sourdough Gummy?
A gummy crumb can happen when:
- The bread is underbaked
- The dough was excessively hydrated
- The loaf was cut while hot
- Fermentation was not optimal
Always allow the loaf to cool completely before slicing.
How to Get a More Open Crumb
If you want those beautiful larger holes inside the loaf, focus on:
- Strong active starter
- Proper fermentation
- Gentle dough handling
- Adequate gluten development
- Careful shaping
- Correct hydration
Don’t simply add more water. Higher hydration makes dough more difficult to handle and does not automatically guarantee a better crumb.
How to Store Sourdough Bread
Once completely cool, store the loaf at room temperature.
For the best crust, avoid sealing freshly baked sourdough in a completely airtight plastic bag.
Instead, use:
- Bread bag
- Paper bag
- Bread box
- Clean kitchen towel
For longer storage, slice the bread and freeze it in an airtight freezer bag.
Frozen sourdough can be toasted directly from frozen.
Easy Sourdough Serving Ideas
Fresh sourdough is delicious with:
- Butter and sea salt
- Scrambled eggs
- Avocado
- Fried eggs
- Cream cheese
- Peanut butter
- Jam
- Honey
- Grilled cheese
- Soup
- Chicken salad
- Tuna salad
It also makes excellent French toast and sandwiches.
Beginner Sourdough Schedule
Here’s an easy example for an overnight loaf:
Morning
Feed your starter and allow it to become active.
Afternoon
Mix flour and water.
Rest.
Add starter.
Add salt.
Begin stretch-and-folds.
Evening
Complete bulk fermentation.
Shape the dough.
Place it into a proofing basket.
Refrigerate overnight.
Next Morning
Preheat Dutch oven.
Score the cold dough.
Bake covered.
Bake uncovered.
Cool completely.
Slice and enjoy.
Final Tips for Successful Sourdough
Use a kitchen scale.
Accurate measurements make sourdough much more predictable.
Watch the dough rather than the clock.
Fermentation times vary depending on temperature and starter strength.
Don’t panic about sticky dough.
Sourdough often starts sticky and becomes easier to handle as gluten develops.
Keep your starter healthy.
A strong starter is the foundation of good sourdough.
Don’t rush the cooling stage.
Let the bread finish setting before slicing.
Practice matters.
Your first loaf may not look perfect, but each bake teaches you how your flour, starter, kitchen temperature, and fermentation behave.
Sourdough Nutrition
Nutrition varies depending on the flour and exact recipe. For a loaf made with the quantities above, the entire loaf contains approximately:
- Calories: 1,900–2,000
- Carbohydrates: 380–400 g
- Protein: 65–70 g
- Fat: 5–8 g
- Fiber: 12–16 g
These values are estimates and will vary according to the flour and starter used.
The Secret to Great Sourdough
The biggest secret isn’t a special ingredient—it’s learning to recognize when your dough is ready.
Once you learn how an active starter looks, what properly fermented dough feels like, how much the dough should rise, and how to create surface tension during shaping, sourdough becomes much less intimidating.